TitanPro Cutting
Upgrading a 3-axis router to a 4-axis model can significantly enhance its capabilities. This transition allows for more intricate designs and better efficiency. According to Tom Sanders, a leading expert in CNC machinery, "Upgrading is not just about adding an axis; it's about unlocking new potentials in your projects."
Understanding how to upgrade a 3 axis router to 4 axis requires both technical skills and industry knowledge. Many users often overlook key components during this process. Properly integrating the additional axis can transform how you approach woodworking or metalworking tasks.
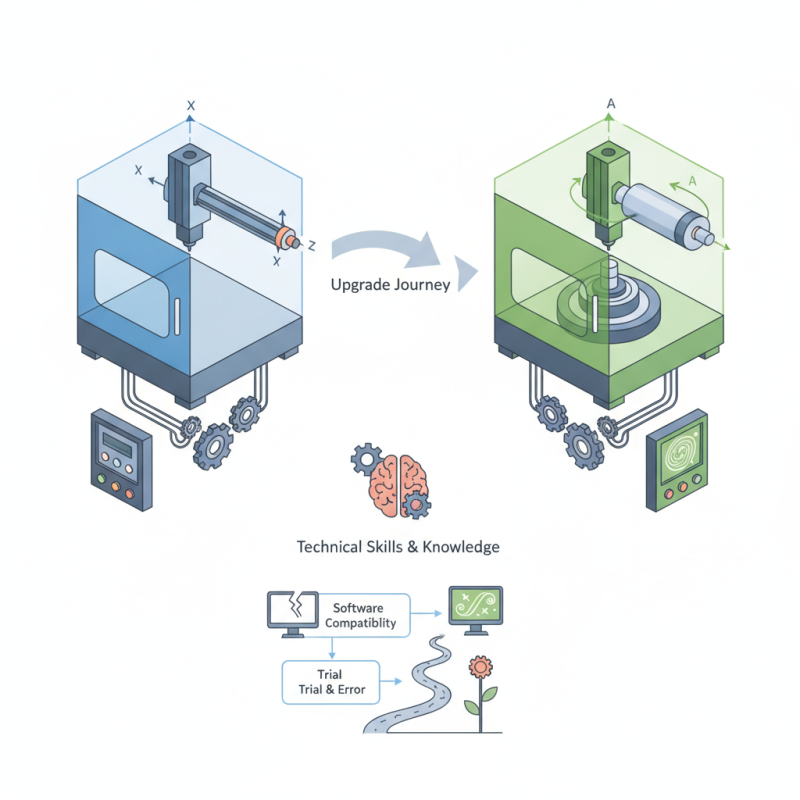
Moreover, it’s essential to consider software compatibility. Many outdated systems struggle with 4-axis functionality, which can lead to frustration. This upgrade journey involves trial and error, where some adjustments may not work as expected. Embracing these imperfections is part of growth in this field.
Upgrading from a 3-axis router to a 4-axis router can dramatically improve your machining capabilities. A 3-axis router operates on three primary movements: X, Y, and Z. However, a 4-axis router adds an additional rotational axis, often referred to as the A-axis. This allows for more complex designs and better efficiency, particularly in cutting circular or cylindrical shapes. According to industry reports, over 70% of manufacturers recognize the value of enhancing production capabilities through 4-axis technology.
Adopting a 4-axis system can result in reduced cycle times and improved accuracy. For instance, parts that previously required multiple setups can often be completed in a single run. Research shows that companies utilizing 4-axis machines have reported lead time reductions of up to 30%. This efficiency can lead to significant cost savings and higher profit margins.
Tips for transitioning: Start by assessing your current workflow. Identify tasks that could benefit from 4-axis capabilities. Consider training your team in 4-axis programming, as smooth adoption relies on skilled operators. Exploring available software options is critical to maximizing the benefits of your new equipment. Be aware that not all materials are suitable for 4-axis machining; some may require a different approach. Transitioning might not be perfect, so allow time for adjustments and refinements in your process.
Upgrading from a 3-axis router to a 4-axis system can be a game changer. It opens up new possibilities in precision machining. The addition of a fourth axis enhances the router’s ability to manipulate materials at different angles. This allows for greater complexity in designs and shapes. Craftsmen can create intricate carvings that were previously difficult or impossible to achieve.
The benefits of this upgrade extend beyond aesthetics. With a 4-axis router, production efficiency improves significantly. Time spent on setup and adjustments reduces, leading to faster project completion. Additionally, fewer manual adjustments lead to decreased human error. This reliability can elevate your craftsmanship. However, it's important to note that this upgrade comes with a learning curve. Mastery of the new system requires time and practice. Mistakes will happen along the way, and patience is essential.
Investing in a 4-axis router allows for creative growth. Challenges will arise, like understanding the new software or mastering the machine's capabilities. Yet, overcoming these hurdles can lead to outstanding results. Each project offers a chance to refine skills and explore new techniques. The journey towards 4-axis efficiency is as valuable as the outcome.
Upgrading a 3 axis router to 4 axis efficiency can significantly enhance your machining capabilities. To achieve this, several key components are essential. You will require an additional rotary axis, which allows for more complex shapes and angles. This is often a significant leap in versatility, yet it demands precise calibration.
Motor drivers are critical in this conversion. They must support the new rotary axis and synchronize smoothly with existing components. Wiring and connectors also play a vital role in ensuring robust signals. Poor connections may lead to inconsistent performance. Installation of limit switches can enhance safety during operation, preventing mechanical failures.
Software compatibility is another concern. Your existing control software might not support a fourth axis. Researching and implementing compatible software will take time. Not every software solution offers ease of use. Testing and adjustments will be necessary to achieve optimal functionality. This process may prove frustrating, as not all trials yield success on the first attempt. Embrace the trial-and-error aspect; it’s part of the learning curve.
Upgrading your 3-axis router to 4-axis capabilities can greatly enhance its efficiency. This transformation allows for more complex designs and intricate machining. However, the installation process requires careful planning and execution.
Begin by evaluating your current router setup. Ensure that all components are compatible with additional axes. You will need to install a fourth stepper motor for the extra axis. This typically involves securing the motor to your router's frame. An added benefit lies in the precision of rotary motion, allowing for tasks like engraving and cutting on curved surfaces.
Tips: Make sure to follow a wiring diagram. This helps to avoid mistakes during installation. Double-check all connections before powering up. Mistakes can lead to damage and costly repairs.
After adding the new motor, update the firmware on your CNC controller. This is crucial for ensuring proper communication with the additional axis. Adjusting the software settings may seem straightforward, but it often requires patience and practice. Don't be discouraged if the initial settings are not perfect; fine-tuning will take time.
Tips: Keep a log of settings and adjustments. Track what works and what doesn't. Your notes can be invaluable for troubleshooting later.
Invest time in calibrating your machine. Accurate setups are essential for successful projects. Always restart and test after making adjustments to verify improvements. The learning curve can be challenging, but persistence will pay off in the long run.
Upgrading your 3-axis router to a 4-axis model can significantly boost your project's capabilities. However, merely completing the upgrade isn't enough. Your focus should now shift to optimizing performance post-upgrade. Start with calibration. Ensuring your router is precisely calibrated allows for intricate designs and improved accuracy.
Another key aspect is software compatibility. Many upgrades will require adjustments in software settings. Exploring features like 4-axis toolpaths can enhance your machining process. You may discover new strategies that streamline your workflow and increase efficiency. It’s worth noting that you'll likely face a learning curve. Embrace this challenge. Experimenting with different settings can yield fascinating results.
Don't overlook maintenance. Regular checks on the hardware are essential. A loose belt or misaligned components can lead to inconsistent performance. Documenting these observations can help refine your router's capabilities. Remember, success may not come instantly. Some adjustments may not produce the desired effects right away. Reflection is critical. Analyzing what's working and what isn't will guide future improvements.
: A 4-axis router enhances precision, allows for intricate designs, and improves production efficiency.
It enables the creation of complex shapes and angles that were previously difficult to achieve.
You need an additional rotary axis, motor drivers, wiring, connectors, and possibly new software.
Yes, existing software may not support a fourth axis, requiring research and adjustments for compatibility.
Calibration is crucial for accuracy, and optimizing software settings can enhance your machine’s performance.
Yes, there’s a learning curve, and you may encounter frustrations. Embrace failures as part of the journey.
Regular maintenance checks are essential. Document observations to identify and resolve issues effectively.
Reflection is necessary. Analyzing your approach will help guide future improvements and adjustments.
Mastery takes time and practice. Be patient, as mistakes are expected along the way.
Yes, overcoming challenges can lead to creative growth and exceptional project outcomes.
Upgrading a 3 axis router to 4 axis efficiency can significantly enhance your machining capabilities and expand the range of projects you can undertake. This article provides a comprehensive guide on how to upgrade a 3 axis router to 4 axis, beginning with an overview of the differences between the two systems. It highlights the numerous benefits of the upgrade, such as increased precision and the ability to work with complex geometries.
Key components essential for the conversion are discussed, along with a detailed step-by-step installation process to help you successfully implement 4 axis capabilities. Finally, the article offers valuable tips for optimizing the router’s performance after the upgrade, ensuring that you can fully leverage the enhanced functionalities of your newly converted machine.