TitanPro Cutting
Converting 2D designs into 3D carving paths can be a challenging task for many creators. Understanding how to convert 2D designs into 3D carving paths opens up new possibilities in art and design. With the right techniques and tools, this process becomes more manageable.
Using CAD software is one of the most effective methods. These tools allow you to turn flat images into three-dimensional models. However, the learning curve can be steep. Many designers struggle with software complexities. It's essential to practice and experiment with different functionalities to find what works best for your design.
Another aspect to consider is the choice of materials. Different materials react differently during carving. Testing various options can lead to unexpected results. Sometimes, what looks great initially might not translate well into 3D. Reflecting on these experiences will help improve future projects and refine your skills. Ultimately, mastering how to convert 2D designs into 3D carving paths requires patience and dedication.
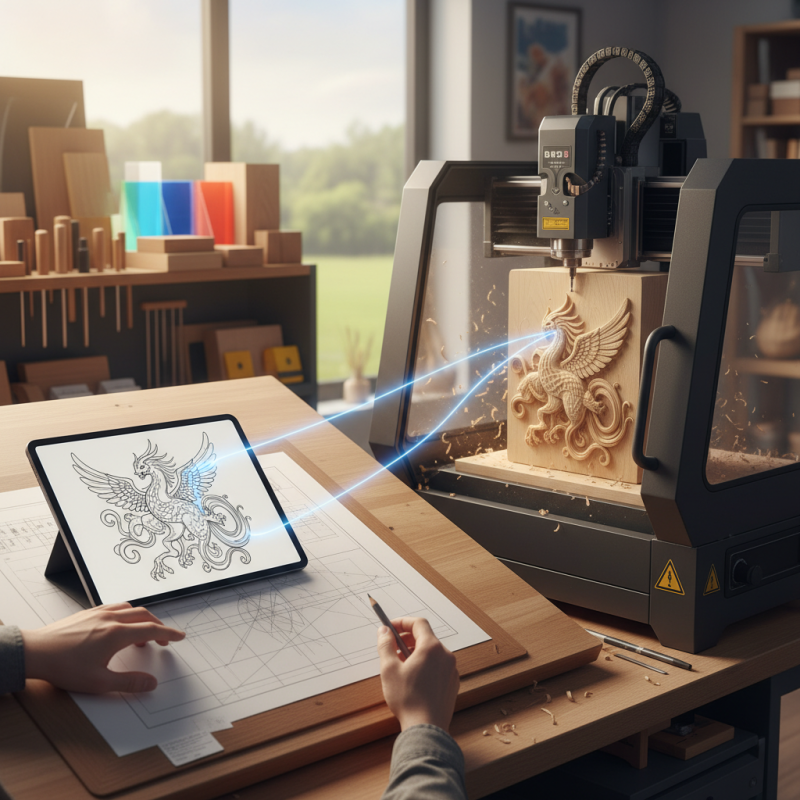
Understanding 2D designs is crucial for creating effective 3D carving paths. 2D designs are usually flat images, like sketches or digital graphics. They contain specific characteristics that define shapes and outlines. Recognizing these features helps in translating them into three-dimensional objects. For instance, consider line thickness and curvature. These elements impact how a design carves into the material.
When working with 2D designs, one must consider the depth and height, aspects often overlooked. A simple design with varying thickness can provide richness in texture. Small details might get lost if not appropriately translated. It's essential to reflect on how shadows and light interact with the design. Mistakes often happen during this process, resulting in surfaces that don't match the original vision.
Carving paths require precise translation from 2D to 3D. Rushing through the details might lead to unsatisfactory outcomes. It's advisable to experiment with different tools and techniques. This can illuminate aspects that enhance or detract from the final piece. Reflection and adjustment are key to improving the conversion process. Embracing imperfection can lead to unexpected and beautiful results.
When transitioning from 2D designs to 3D carving paths, selecting the right software is crucial. There are many options available, each offering different features. It's important to look for software that supports various file formats, ensuring compatibility with your design files. Some programs provide advanced tools for manipulation and adjustment, which can enhance the quality of your 3D outcomes.
User-friendly interfaces are important, especially for beginners. Simpler software allows users to focus on creativity rather than getting lost in complex functionalities. However, this simplicity may come at the cost of deeper features. Experimenting with different tools can help you find the right fit. Don't hesitate to try multiple programs; each has its learning curve and unique advantages.
Documentation is a key aspect of reliable software. Good tutorials and community support can make a significant difference in mastering the tools. You might encounter challenges, like software crashes or bugs, which require patience to navigate. Reflecting on your experiences with each tool will aid you in honing your skills for better results. Keep in mind that the learning process itself can be as valuable as the final product.
Converting 2D designs into 3D carving paths can seem daunting. However, with a clear step-by-step process, it becomes manageable. Begin by choosing a suitable design, ensuring it has clear outlines. Utilize vector software to trace your image, converting it into a compatible format.
This is crucial for precise carving.
Next, import your traced design into a computer-aided design (CAD) program. Here, you'll define the carving depth and tool paths. Use simple shapes like circles and rectangles to test your settings first.
It’s important to note that not all designs translate well into 3D. Some may require additional modifications.
After setting up, simulate the carving process. This step helps catch mistakes early. Pay attention to details, as slight adjustments can significantly impact the final product. Remember, practice makes perfect. Don’t hesitate to revisit your original design if needed.
Each project can be a lesson in refining your technique. Embrace the learning curve; it’s all part of the creative journey.
When converting 2D designs into 3D carving paths, adjusting settings is crucial for achieving the best results. Start by selecting the appropriate bit size. A smaller bit creates finer details, while a larger bit speeds up the process. It’s essential to test different bits on various materials. Each material reacts differently. For instance, wood might absorb more moisture, while acrylic can melt if the feed rate is too high.
Another important setting is the feed rate. This determines how fast the carving tool moves across the material. Too fast can lead to chipping or burning, while too slow may produce an uneven finish. Experimenting with different speeds can help you find the sweet spot. Don’t forget to consider the depth of cut as well. A deeper cut can enhance detail but may strain your tool.
It’s easy to overlook the importance of these settings. If you find your designs don’t translate well into 3D, reflect on your settings. Adjust them and re-test. Learning from failures is part of the process. Pay attention to how slight adjustments lead to significant improvements. Each project teaches valuable lessons on what works and what doesn’t. Embrace the learning journey.
Testing and refining your 3D carving paths is crucial for achieving high-quality results. First, begin with a trial run using inexpensive materials. This helps you understand how well your design translates from 2D to 3D. Check if the depth and detail meet your expectations. Be prepared to make adjustments. Sometimes, what looks good on screen does not work perfectly in real life.
Take note of any discrepancies during your test runs. Perhaps certain areas lack detail, or the carving isn’t as precise as expected. Address these issues by tweaking your design parameters. It might involve altering the bit size or adjusting the feed rate. These fine-tuning steps are essential in mastering your carving technique. Remember, every failure is an opportunity for improvement.
**Tips:** Always document your settings and results. This practice can save time in future projects. Additionally, seek feedback from peers. They might offer insights you hadn’t considered. Don’t hesitate to try different approaches; sometimes, a fresh perspective is all it takes to refine your process effectively.
: Begin by choosing a suitable design with clear outlines.
Use vector software to trace your image into a compatible format.
Simulating helps catch mistakes early and allows you to make necessary adjustments.
Take note of discrepancies and tweak your design parameters as needed.
Not all designs translate well. Some may require additional modifications.
Conduct trial runs using inexpensive materials to better understand your design's performance.
Yes, this can save time and improve future projects significantly.
Address the issues by altering bit size or adjusting the feed rate.
Absolutely, feedback can provide new insights for improvement.
Embrace failures as opportunities for learning and improvement.
In the process of how to convert 2D designs into 3D carving paths, it is essential first to understand the characteristics of 2D designs and how they can be transformed into three-dimensional forms. Selecting the right software is crucial, as it facilitates the conversion by providing the necessary tools and features.
The step-by-step process for creating 3D carving paths typically involves importing the 2D design, configuring the parameters for depth and detailing, and ensuring the design translates effectively into a 3D model. Adjusting settings for optimal carving output is equally important, as it directly impacts the quality and precision of the final piece. Finally, testing and refining your 3D carving paths help ensure a successful outcome, making your conversion from 2D to 3D both efficient and satisfying.